software တစ္ခုကိုမိတ္ဆက္ေပးခ်င္ပါတယ္။
programmer ေတြ ၊ software developer ေတြ မိမိရဲ႕ source code ကုိအေျပာင္းအလဲ လုပ္တိုင္း source code file ကို
revision no အသစ္တစ္ခုျဖင္႔ သိမ္းဆည္းထားၿပီး မူလ source code ကို မေျပာင္းလဲေစပဲ မိမိရဲ႕ source code အေျပာင္းအလဲကို
revision no အလုိက္ျမင္ႏုိင္ေသာ version control system တစ္ခုျဖစ္ပါတယ္။
အဲဒီ system ကို အသုံးၿပဳဖုိ႔ ကြ်န္ေတာ္ linux os ကိုေရြးခ်ယ္ပါတယ္။ open source မိုလို႔ အားလုံးနဲ႔ အဆင္ေျပမယ္လုိ႔ထင္ပါတယ္။
Linux OS မွာ repository ဟုေခၚေသာ folder တစ္ခုကို create လုပ္ေပးရပါမယ္။
ကြ်န္ေတာ္သုံးတဲ႔ Linux က Fedora Core 9 ပါ။
Part I. Requirement for using Subversion Control system in Linux
(1)Apache Web server
(2)PHP
(3)Mysql server
(4)subversion packages
(5)mod_dav_svn modules loaded for your Apache web server
Part II. Requirement for using Subversion client in Developer PC or Programmer PC
(1) TortoiseSVN-1.5.5.14361-win32-svn-1.5.4(http://tortoisesvn.net/downloads)
(2) Eclipse Editior with plug-in for subversion client(http://www.eclipse.org/downloads/)
(3) Microsoft Visual Studio 2008
နံပါတ္ (I) က မိမိႀကိဳက္ႏွစ္သက္ရာ linux OS မွာ Source Code folder ကို ထားၿပီး နံပါတ္(II) Developer ေတြနဲ႔ progarmmer ေတြက
Visual Studio and Eclipse Editor ကိုအသုံးၿပဳၿပီး source code ကို automatic chages လုပ္ႏိုင္တဲ႔ သေဘာပါ။
command Line သုံးစရာမလုိဘူးေပါ႔ ။
--------------------------------------------------------------------------------------------------------------------------------------------------------------------
Configuration And Editing in Linux Server
1. Install Apache (httpd), PHP, MySQL (server and client), and the component that allows php to talk to mysql.
yum -y install httpd php mysql mysql-server php-mysql
2. Configure the new services to start automatically
/sbin/chkconfig httpd on
/sbin/chkconfig --add mysqld [this is not required with FC4 and above]
/sbin/chkconfig mysqld on
/sbin/service httpd start
/sbin/service mysqld start
3. IMPORTANT! Set up the mysql database root password. Without a password, ANY user on the box can login to mysql as database root. The mysql root account is a separate password from the machine root account.
mysqladmin -u root password 'new-password' [quotes are required]
4.Create a test PHP script under /var/www/html (such as phpinfo.php) and place it in the document root. A useful test script sample:
After finish installing this type of steps, u will be ready to use Apache, php and mysql server.
So next step is to begin installation subversion and svn_module .
5. yum install subversion
Yum install dav_svn_module
After running this command, u can see subversion.conf configuration file under /etc/httpd/conf.d/subversion.conf.
6. Create one repository under your choosen path.
mkdir /var/svn/newrepos
svnadmin create /var/svn/newrepos
So now Repository folder was created under /var/svn/newrepos in subversion control system.
7.Create one project folder including your source code files and import your source code project folder into subversion repositories.
For example, I create one project folder under root path.
mkdir project
svn import -m “Intial import ” /project file:///var/svn/newrepos (make sure /// three slashes after file)
importing project folder into /var/svn/newrepos(Repository folder in Linux) means that one more working copy of project folder are stored under /var/svn/newrepos/newrepos.
8. Now can see this folder under /var/svn/newrepos

ဒီ configuration ေတြ အကုန္ၿပီးသြားရင္ ကြ်န္ေတာ္ version control system ကို ဘယ္လို access လုပ္ရမယ္ဆုိတဲ႔ အပိုင္းကိုဆက္လက္တင္ၿပပါမယ္။
There are 3 ways to access version control system by
(1) svn:///Server_ip/var/svn/newrepos in TortoiseSVN client
(2) wget http://Server_ip/svn in linux or http://Server_ip /snv in Firefox
(3) wget http://Sever_ip:port/svn or http://Server_ip:port/svn in Firefox
8.1
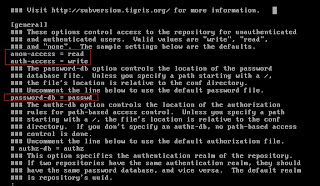
ကြ်န္ေတာ္တုိ႔ ပထမနည္းကို အသုံးၿပဳမယ္ဆိုရင္
Edit for svnserve.conf for user file access

8.2
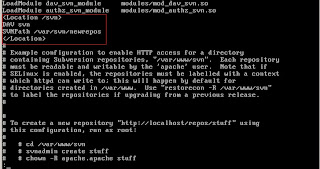
(2) ဒုတိယနည္းကိုအသုံးၿပဳမယ္ဆုိရင္

Add this command under LoadModule
DAV svn
SVNPath /var/svn/newrepos
DAV svn
SVNPath /var/svn/newrepos
8.3
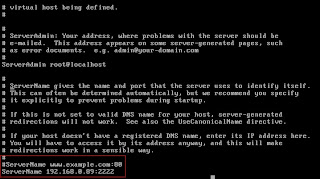
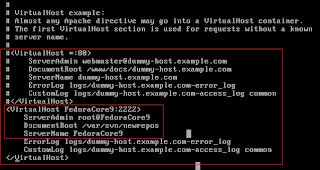
(3) တတိယနည္းကို အသုံးၿပဳမယ္ဆုိရင္
Need to edit in httpd.conf under /etc/httpd/conf/httpd.conf


ဒီ configuration file ေတြအကုန္ၿပင္ၿပီးရင္ subversion system အတြက္ Linux မွာ server configuration ေတြ အကုန္ၿပီး ပါၿပီ။
ကြ်န္ေတာ္ ေနာက္ေန႔ ေတြက်ရင္ ဆက္ၿပီး subversion client နဲ႔ server တြဲသုံးပုံကို ဆက္လက္တင္ၿပပါမယ္။
ကြ်န္ေတာ္႔ အေရးအသားတြင္ run လုိ႔မရေသာ အေၾကာင္းအရာမ်ားႏွင္႔ technical အေရးအသား အသုံးအႏႈန္းမ်ားလိုပါက Comment ထား ႏုိင္ပါသည္။
ကြ်န္ေတာ္တင္ၿပေသာ 8.3 သည္ virtual host တင္ၿပီး port ကို 2222 သုိ႔ေၿပာင္းလဲ သုံးထားျခင္းသာျဖစ္ပါသည္။ linux apache webserver တြင္ တျခားေသာ application (SugarCRM) ကဲ႔သို႔ေသာ application ႏွင္႔ တြဲသုံးလ်ွင္ Sugar CRM ကဲ႔သို႔ေသာ application crash ျဖစ္တတ္ေသာေၾကာင္႔
New port and virtual ip ကို သုံးထားျခင္းျဖစ္ပါသည္။
New port and virtual ip ကို သုံးထားျခင္းျဖစ္ပါသည္။
I wish that All of my blog reader enjoy study !!!!
No comments:
Post a Comment